 On July 1st, 1916 the British Army in France launched a major offensive north of the river Somme. The objective of the offensive was to relieve the French army at Verdun, break through the German lines into open country, and re-establish mobile warfare. With an army in excess of two million men and with an unprecedented amount of artillery guns and shells the British army was confident it would smash the Germans and regain the initiative. Unfortunately the bombardment was largely ineffective, most of the British gains were negligible, and the British army suffered nearly 60,000 casualties on the first day of the offensive alone. Rather than marking the beginning of a brilliant campaign the first day of the Somme was perhaps the worst day in the military history of the British Empire. A combination of political considerations, faulty strategy and tactics, and a bit of bad luck doomed the chances of any significant progress being made by the British army that day.
The origins of the “Battle of the Somme” date back to the end of 1915 when the allied powers debated strategy for the coming year. One of the foremost considerations facing the allies was that the central powers had the advantage of interior lines. In other words the central powers had shorter lines of communication which allowed the Germans to transfer reserves to any threatened sector quicker than the allies. Much like the campaigns of Frederick the Great in the “Seven Years’ War,” the Germans used this advantage to defeat their enemies in detail, smashing one on one front then rushing troops to another. The obvious solution to this problem was for the allies to mount simultaneous offensives to limit Germany’s freedom of action.
Thus the plan for 1916 was for the allies to launch simultaneous offensives to negate Germany’s advantage in interior lines and hoping for a significant success on one of the fronts. The offensives were planned for the middle of the year when it was hoped Britain would have enough troops on the western front and the Russian army would have recovered from the setbacks it suffered in 1915. The allies planned to launch three major offensives: The Russian army would attack both the Germans and the Austrians in the east, the Italians would attack the Austrians in the Alps, and the French and British would attack the Germans north and south of the river Somme.
The plan seemed sensible enough in theory, however the allies might have been wise to remember Moltke the Elder’s maxim that “no battle plan survives contact with the enemy.”
The first blow to the allied plan occurred when the Germans pre-empted the allies by launching a major offensive against the French near Verdun. Whether or not General Falkenhayn launched the “Battle of Verdun” to take the city or to bleed the French Army white it soon became clear that the French army, at that point the most effective army in the alliance, would have to devote its main attention to defending Verdun. This not only deprived the combined offensives of much of their strength, but automatically delegated the main effort for the offensive on the western front to the largely inexperienced British Army.
The next setback for the allies came in March when a poorly planned Russian offensive against the Germans failed. This, along with the disasters on the Eastern front the previous year, effectively eliminated any chance of significant offensive action against the Germans by the Russians during the summer.
A further hitch in the allied plan occurred on the Italian front. In March an Italian offensive against the Austrians failed to achieve any significant results. Even worse, a further Italian offensive planned for the summer was pre-empted by the Austrians in the middle of May. Striking at the Italian’s left flank in the Trentino region and employing massive artillery support the Austrians took 50,000 prisoners, overran two defensive lines, and seemed on the verge of breaking out into the Venetian plain.
However, this disaster was balanced by an attack launched against the Austrians by Russian forces under the command of General Brusilov in June. The Austrians, low on troops because of their offensive on the Italian front and with questionable morale after repeated failures against the Russians, soon broke. After a month of fighting the Russians had advanced 60 miles and taken 350,000 prisoners. Unfortunately for Brusilov the Germans, whose reserves were not being pinned down by any allied attack, sent troops to aid the Austrians. So far the allied strategy for 1916 had been a complete failure.
The “Battle of the Somme” has to be seen in this context. Rather than being launched as one of several simultaneous major offensives on three fronts, it was effectively mounted on its own; Brusilov’s attack against the Austrians was only planned as a subsidiary offensive against a secondary enemy. Additionally, rather than taking the subordinate role in the western offensive as planned, the less experienced British army had to take on the main role as the French were bogged down at Verdun. Finally, the British were forced to bring their offensive forward to an earlier date to relieve the French at Verdun. While it is arguable that this was a necessary evil of coalition warfare it deprived the British forces of additional time to train and build up men and supplies. Under these circumstances the launching of the “Battle of the Somme” looks less like an attempt to break the Germans as a desperate gamble to regain the initiative for the allies.
Yet despite these gloomy circumstances the commander of the British Army in France, General Douglas Haig, was optimistic about the forthcoming offensive. Douglas Haig is perhaps the most controversial figure in British military history. While some historians consider him a callous and incompetent commander who misunderstood trench warfare and needlessly butchered scores of his own men, others consider him a great captain in the mould of Marlborough or Wellington. The truth is probably somewhere in between. Without doubt Haig made many mistakes and was often slow, like most Generals on both sides, in understanding the new realities of warfare in the early 20th century. However, he did learn from his mistakes, built the British army into perhaps the most modern fighting force in the world, and led it to victory over the German army in 1918.
However, the army that would defeat the German army in 1918 was a very different force in 1916. In 1914 Britain had sent the small, but professional, British Army to France to fight the German army. Despite few artillery pieces and machine guns the British army had performed admirably against superior German forces at the battles of “Mons,” “Le Cateau,” and the “First Battle of the Marne.”
But perhaps its most notable achievement was during “the First Battle of Ypres” when the Germans tried crushing the Ypres salient and reinitiating mobile warfare after the onset of trench building after the “First Battle of the Marne.” While the Germans had an overwhelming advantage in numbers and artillery, the British had two points to their favour: Firstly, whereas the Germans, like most other European armies, relied on a largely conscripted force, the British, thanks to the protection of the Royal Navy, could afford to build a smaller volunteer force of more permanent and better trained soldiers. The second advantage, related to the first, was the British soldiers’ expert marksmanship.
It has been said that the average infantryman in the original BEF could fire off twenty aimed shots a minute. This was fortunate given the lack of machine guns in the British army. The second advantage was also enhanced by the German practice early on in the war, and subsequently again in 1918, of attacking in dense columns.
However, despite these advantages the battle was a close call and without French help, and a bit of luck, the British probably would have lost. But victory came at a high cost, “the First Battle of Ypres,” along with the previous battles in 1914, effectively destroyed the small professional force Britain had sent to France at the onset of war. Even with the part time territorial forces Britain had trained prior to the First World War and the battles they fought on the western front in 1915, most of the British troops who fought north of the Somme in 1916 were green.
Haig’s original plan for 1916 was to launch the British offensive in the Ypres salient, not in the Somme region. Strategically at least there was a better case in attacking there instead of the Somme. A major success at Ypres would possibly free the Belgium ports where German submarines were operating from against allied shipping and offered a better chance of rolling up the German line. While the Germans could have afforded to lose ground in the Somme area, they could not do so around Ypres. The lines of communication there were much closer to Germany and a significant loss of this territory would put much of the German position in France in peril. Additionally the Ypres salient was not as fortified in 1916 as it would be in 1917.
The same cannot be said about the Somme front. While a breakthrough there would have been a success for the allies, the Germans could afford to retreat and give up much territory without seriously affecting their position. The proof of this logic was seen in early 1917 when the Germans retreated from the earlier Somme battlefield to the Hindenburg line while they did not retreat an inch in the Ypres salient. Additionally, and while the British had no way of knowing it at the time, the German bunkers dug into the chalky hills of the Somme were virtually indestructible against the few high explosive shells the British army had in 1916.
Whether or not a major British offensive at Ypres in 1916 would have met with more success than at the Somme is an interesting question, but it is ultimately academic as the combination of French pressure and the Belgium army’s refusal to coordinate with an offensive in Flanders convinced the British not to proceed.
The original plan for the Somme offensive in 1916 was for the French and British Armies to attack North and South of the river, breakthrough the German lines, and re-establish mobile warfare. As stated above, the French were supposed to play the greater role in the campaign, but as the battle at Verdun took up increasing numbers of French troops the British assumed the greater role by default.
The tactical means to achieve victory depended, like nearly all offensives in the “First World War,” on the effectiveness of the artillery bombardment. Despite what later theorists would say the tank was not the decisive weapon of the conflict. While undoubtedly the tank was a much useful weapon that contributed to significant victories such as “Cambrai” in 1917 and “Amiens” in 1918, it was also notoriously slow, which made it vulnerable to high explosive shells, and was constantly plagued by mechanical difficulties. The machine gun, which came to age during the war was also an important weapon, but killed and wounded much less soldiers than artillery. In fact artillery inflicted more than 70% of all military casualties during the war. It was also the only weapon that could effectively cut barbed wire, destroy bunkers and smash trenches.
The British were optimistic about the forthcoming offensive because the artillery bombardment that preceded the attack at the Somme was the largest and longest up to that point in the war. It was hoped that the bombardment would destroy the Germans in their trenches and that the British would be able to breakthrough into open country.
Given the sheer numbers of guns and shells that were massed for the attack there was a good chance, at least in theory, that the British offensive would succeed.
However, several factors combined to render the bombardment mostly ineffective. Firstly, despite having an unprecedented amount of guns and shells available for the offensive, the British attacked on a length of front that critically spread out their resources. It should be noted that one of the reasons why the French army did better on the first day of the Somme than the British army was that they had one gun for every 18 meters of front, while the British had one per every 50 meters. The British decision to launch an offensive on such a wide front was based on the consideration that previous attacks launched on much shorter fronts had the tendency to collapse when the enemy attacked the flanks of the attacking force, as the Germans did against the British at “Neuve Chapelle”, and the French did against the Germans at “Verdun.” While this was a valid concept the British simply did not have the adequate artillery resources to effectively bombard such a length of front as they chose around the Somme.
The amount of artillery pieces the British had compared to the length of front they were attacking on was very low on the Somme compared to other battles they fought on the Western Front during the “First World War.” Other battles such as Neuve Chapelle in 1915 and the hundred days in 1918 saw a much denser ratio of guns per length of front.
Another serious dilution of the effectiveness of the artillery bombardment occurred because of a difference of opinion regarding strategy between Sir Douglas Haig, the Commander of the British Army in France, and General Henry Rawlinson, the head of the British 4th Army responsible for the offensive north of the Somme. Haig wanted the 4th Army to bombard and attack the first and second lines of German trenches simultaneously to increase the chances of a breakthrough. However, Rawlinson wanted to bombard and attack the trench lines one at a time in “bite and hold” operations that were tactically more feasible, yet strategic less rewarding. Ultimately Rawlinson relented to Haig’s advice and had to stretch his artillery resources that would probably have been hard pressed to neutralize even the first line of trenches. With hindsight Rawlinson was correct in thinking that trying to overrun both trench lines was over ambitious, but to be fair Haig had to think at the strategic level where defeating the Germans and pushing them out of France was a priority while Rawlinson’s responsibilities were limited to commanding his own army.
Another difference of opinion between the two Generals that also limited the effectiveness of the artillery related to how the bombardment would be used to neutralize the German trenches. While Rawlinson wanted to use the artillery to bombard the entire length of the attacking front equally, Haig wanted to concentrate it mostly against the tougher spots of the German lines. In this case Haig was correct as neutralizing the hardest spots of resistance had a better chance of breaking the Germans as they would have been unable to hold the weaker spots if the British broke through the tougher defences. Unfortunately this time Haig did not overrule Rawlinson and the already strained artillery resources had little chance in neutralizing the Germans’ tough positions.
There were also problems regarding the shells the British used for the offensive. Firstly, the British had a short supply of high explosive shells that were needed to cut the barbed wire and destroy trenches and bunkers. By default most of the shells used during the bombardment were shrapnel, which were good at killing and maiming soldiers in open battle, but much less effective at cutting barbed wire and neutralizing trenches and bunkers. Secondly, due to the rapid expansion in the British armaments industry that barely existed in 1914 there were issues regarding quality control when it came to shell production. As such it has been estimated that 30%, or nearly 1/3, of the shells used during the bombardment were duds.
Finally there were two other factors that limited the bombardment. One was that the chalky soil of the Somme area was very hard to neutralize via shelling (one of the reasons Haig would have preferred attacking in the Ypres salient) and the second was that the Germans had constructed very deep and strong bunkers under their trenches.
All these factors, the poor ratio of guns per length of front, the decisions to bombard both lines of trenches simultaneously and the whole length of the front equally rather than focusing on the tougher spots, as well as the lack of heavy explosive shells and having a high proportion of faulty shells, goes a long way to explain why the bombardment was so ineffective.
A few more tactics used to start the offensive also contributed to the massive slaughter on July 1st, 1916. One was regarding the use of a creeping barrage for the offensive. A creeping barrage is where infantry advance just behind an artillery bombardment so that they can to rush the opposing trenches once the bombardment halts and before the enemy has time to leave their bunkers and re-man their trenches. Such a tactic requires careful coordination between infantry and the artillery. The British army in 1916 was mostly green and due to the fear of their men getting hit by their own shells the British soldiers advanced too far behind the barrage for it to protect them. Additionally, the British soldiers in general were unable to keep up to the expected pace to be in the right position every time the barrage lifted from one point to another. As such, while the British were able to use the creeping barrage with considerable success later on in the war, on the first day of the Somme it was generally ineffective.
Perhaps a bigger controversy was regarding the pace the British soldiers were told to use when crossing no man’s land on the first day of the offensive. The popular perception of the battle has the British Generals telling their soldiers to expect no resistance as no Germans would be alive and that they could therefore walk slowly across no man’s land. In reality the decision about how quick to go across no man’s land was made at the battalion level. Some battalions disregarded the general advice to walk and tried getting their men across as quickly as possible. A few were even bold enough to advance into no man’s land during the latter part of the bombardment so they would be even closer to the German trenches when they started to move forward.
While the universal adoption of a faster pace to cross the battlefield would have saved more lives it would not have led to a significant victory due to the failure of the artillery to adequately cut the barbed wire and destroy trenches, the ineffectiveness of the creeping barrage and the questionable practice of having most of the soldiers heavily weighed down by more than 50 pounds of equipment while crossing. While those battalions that rushed across no man’s land generally had more success than those that did not, most of them had to withdraw either when the soldiers on their flanks failed to keep up or with them, or when the Germans counter-attacked.
Other factors, such as the dilemma between using extended line formations or smaller groups employing fire and movement tactics while crossing no man’s land, and the use of smoke, also contributed to the disaster. Extended line formations, the politically correct term for human wave assaults, can be an intimidating sight for the opposition and has the potential of overwhelming the enemy by sheer weight of numbers. However, it generally produces more casualties than using smaller groups who support each other with covering fire as they advance. The British generally used the extended line formations on the first day of the Somme because General Rawlinson felt his soldiers were too inexperienced to use fire and movement tactics.
Another reason why the French did better than the British on the first day of the offensive was they generally adopted the practice of using smaller groups to lead the attack. As for the employment of smoke, Rawlinson left that decision to his corps and division commanders with the result that those who used it to screen their soldiers generally suffered fewer casualties than those who did not. However, just like the pace used to cross the battlefield, the universal adoption of these tactics would probably have saved more lives, but would not have produced a decisive victory in the absence of an effective artillery bombardment.
The first day of the Somme was supposed to mark the beginning of a major offensive that would break the German lines and re-establish mobile warfare. The artillery was supposed to smash the German trenches and bunkers, cut the barbed wire, and protect the British infantry with a creeping barrage. Meanwhile the British infantry would quickly occupy the German trenches and then breakout into open country. In reality, the first day of the Somme was a bloody tragedy with the British army suffering nearly 60,000 casualties for negligible gains at best. While the British did well on the right sector of their attack, and the French made considerable progress on their part of the front, the offensive quickly bogged down into a battle of attrition.
The first day of the Somme was a slaughter because of a combination of political, strategic and tactical factors, and a bit of bad luck. The Somme offensive, of which the British were supposed to play the lesser role, was supposed to be one of several simultaneous major attacks launched against the Germans in mid 1916. However, the German attack at Verdun, the failed Russian offensive in March, and the negligible progress made on the Italian front effectively placed the burden of launching the major offensive of the year for the allies on the British Army. The British were pressured by the French to launch the offensive on the strategically negligible and topographically unfavourable ground near the Somme rather than Haig’s preference to an offensive in the Ypres salient. In spite of being preceded by what was up to that point the longest and most heavy bombardment of the war, the artillery was not used in an efficient manner and ultimately failed to cut the barbed wire, destroy the German trenches and protect the British infantry with a creeping barrage. Finally, the failure to emphasize on getting the British infantry across no man’s land as fast as possible, the universal adoption of extended line formations, and the limited use of smoke to screen the infantry’s advance, further lowered the chances of overrunning the German trenches, or at least to reduce casualties.
Yet despite all the carnage historians have argued that the Battle of the Somme wore down the Germans more than the Allies and that the British army used what it learned from the campaign to great effect in 1917 and 1918. However, while it is now generally acknowledged that the British army defeated the Germans in the field in 1918 there can be no denying the fact that the first day of the Somme, which resulted in 60,000 casualties for the British alone, was unequivocally the bloodiest day in British military history.
Bibliography
Marston, Daniel. The Seven Years’ War. Oxford: Osprey, 2001.
McCarthy, Chris. The Somme: The Day by Day Account. London: Brockhampton Press, 1998.
Neillands, Robin. The Great War Generals on the Western Front 1914-18. London: Robinson Publishing, 1999.
Prior, Robin and Trevor Wilson. The First World War. London: Cassell, 1999.
Sheffield, Gary and John Bourne. Douglas Haig: War Diaries and Letters. London: Phoenix, 2005.
Sheffield, Gary. Forgotten Victory. London: Headline Book Publishing, 2001.
Sheffield, Gary. The Somme. London: Cassell, 2003.
Terraine, John. The Great War. London: Woodsworth Editions, 1999.
Website Article on the Battle of the Somme from First World War.com [Online]http://www.firstworldwar.com/battles/somme.htm [2009, August]
Wikipedia Article on the Battle of the Somme [Online]http://en.wikipedia.org/wiki/Battle_of_the_Somme [2011, May]
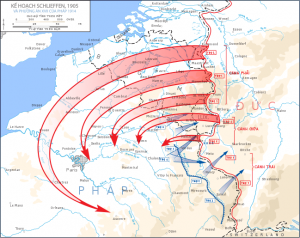 The “Schlieffen Plan” of the First World War is arguably the most widely known battle plan in the history of warfare. It is thought that Count Schlieffen’s plan was based on Hannibal’s victory at Cannae and inspired by the last chapter from Carl Von Clausewitz’s “On War” entitled “The Plan of a War designed to Lead to the Total Defeat of the Enemy.” Ultimately the plan failed. Or did it? It is well known that certain aspects of the plan were changed by Schlieffen’s successor Moltke the Younger. Many of these changes were crucial to the original plan and Count Schlieffen criticized Moltke the Younger for altering his magnum opus before he died.